The Graph Management pane is by default located along the left hand side of a graph window. It lists the table from which the graph was created, the X-axis, Y-axes (left and right) and all graph layers that were added to the current graph window.
The upper part of the Graph Management pane contains information on the title of the graph, the legend of the graph, the table from which the graph was created, and the X-axis, Y-axis (left) and Y-axis (right). All items are editable, except for the table name.
Graph layers are listed at the lower part of the Graph Management pane. They are preceded by a check box to show or hide the layer (show ![]() or hide
or hide ![]() ). You can modify the name of each graph layer and the appearance of each graph layer.
). You can modify the name of each graph layer and the appearance of each graph layer.
In short, the Graph Management pane allows you:
|
|
To edit the title of the graph. |
|
|
To show or hide the legend of the graph. |
|
|
To open the table from which the graph was created. |
|
|
To edit the appearance of the X-Axis, Y-axis Left or Y-Axis Right (including a description of the axes and grid lines). |
|
|
To edit the additional text describing an axis. |
|
|
To change the minimum and maximum value used on an axis. |
|
|
To show/hide a graph layer and to change the display options of a graph layer. |
Individual graph layers can be switched on ![]() or off
or off ![]() ; also the legend can be switched on or off.
; also the legend can be switched on or off.
The right mouse button can for instance be used to remove a graph layer, or to add another graph layer.
You can move the Graph Management pane and dock it along the right hand side or the left hand side of a graph window; you can also make the Graph Management pane floating. The Graph Management pane can be hidden or shown with the Graph Management command on the View menu. Some of the actions that are available via the Graph Management pane are also available in the graph window itself or via the context-sensitive menu.
The functionality is described in three small sections:
You can furthermore refer to the Example below.
1. Title, legend, table
To edit the title of the graph:
Settings include text of title, font, font size, etc.
Tip: To edit the title of a graph, you can also directly double-click the title in the graph window itself.
To hide or show the legend in the graph window:
Tip: To move the legend in a graph window, click the legend in the graph window and drag it to another position.
To open the table from which the graph was created:
2. Axes
To change the settings of the X-axis or Y-axis (left or right)
|
|
to modify the X-axis; the X-axis dialog box will appear. |
|
|
to modify the Y-axis (left); the Y-axis (left) dialog box will appear. |
|
|
to modify the Y-axis (right); the Y-axis (right) dialog box will appear. Click the check box to show |
Settings include among others additional text for an axis, axis type (linear, logarithmic, or normal probability), minimum and maximum values used by an axis, interval, grid lines, font and font size.
Tips:
To change the values used on the X-axis or the Y-axis (left or right):
To edit the additional text for an axis:
3. Graph layers
To show or hide a graph layer:
To modify the appearance of a graph layer:
Settings include name of the graph layer, symbol type, size, line type, color, etc.
To add a graph layer:
Tip: To add a graph layer to the graph window, you can also use the Add Graph command on the Edit menu, or the Add Graph ![]() button in the toolbar.
button in the toolbar.
To change the order of graph layers:
To remove a graph layer:
Tip: To remove a graph layer from a graph window, you can also use the Remove Layer command on the Edit menu, or the Remove Layer ![]() button in the toolbar.
button in the toolbar.
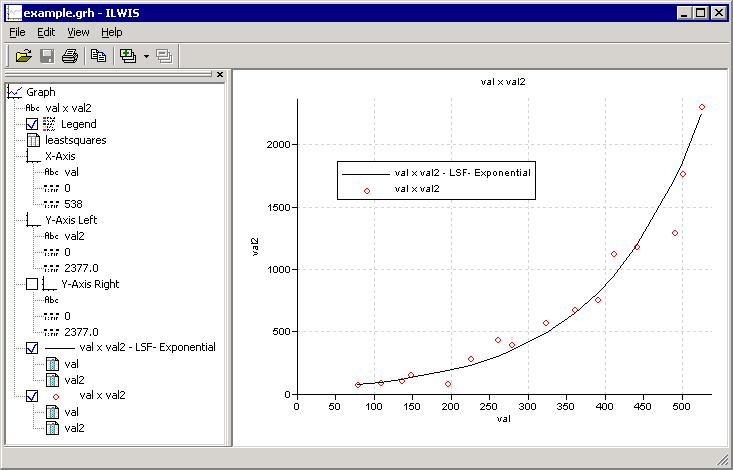
The functionality of the Graph Management pane will be demonstrated by an example shown in the graph window below. The graph window shows:
|
|
Title: Double-click to edit the title of the graph, select a font, font size etc. for the title in the Title dialog box. |
|
|
Legend: Click the check box to show |
|
|
Table name: Double-click to open the table from which the graph was created, or click with the right mouse button and choose Open from the context-sensitive menu. |
|
|
X-axis: Double-click to change the settings of the X-axis in the X-axis dialog box. Settings include among others axis text, type of axis (linear, logarithmic, normal probability), minimum and maximum values used by the axis, interval, grid lines, font and font size. |
|
|
Text: Double-click to directly change the additional text describing the X-axis. |
|
|
Minimum value: Double-click to directly change the minimum value for the X-axis. |
|
|
Maximum value: Double-click to directly change the maximum value for the X-axis. |
|
|
Y-axis (left): Double-click to change the settings of the Y-axis (displayed on the left of the graph) in the Y-axis (left) dialog box. Settings include among others axis text, type of axis (linear, logarithmic, normal probability), minimum and maximum values used by the axis, interval, grid lines, font and font size. |
|
|
Text: Double-click to directly change the additional text describing the Y-axis. |
|
|
Minimum value: Double-click to directly change the minimum value for the Y-axis. |
|
|
Maximum value: Double-click to directly change the maximum value for the Y-axis. |
|
|
Y-axis (right): Click the check box to show Double-click to change the settings of the Y-axis (displayed on the right of the graph) in the Y-axis (right) dialog box. Settings include among others axis text, type of axis (linear, logarithmic, normal probability), minimum and maximum values used by the axis, interval, grid lines, font and font size. |
|
|
Text: Double-click to directly change the additional text describing the Y-axis on the right. |
|
|
Minimum value: Double-click to directly change the minimum value for the Y-axis on the right. |
|
|
Maximum value: Double-click to directly change the maximum value for the Y-axis on the right.
|
|
|
|
|
|
Graph layer: Double-click to change the display options of this graph layer. As this layer is a least squares fit, the Graph Options - Least Squares Fit dialog box will appear. Settings include among others name of the graph layer, line type, color, line width, and function used to calculate the least squares fit. |
|
|
Columns: The name of the columns in the table from which this least squares fit was calculated.
|
|
|
|
|
|
Graph layer: Double-click to change the display options of this graph layer. As this layer is a point graph from two columns in the table, the Graph Options - Graph from Columns dialog box will appear. Settings include among others name of the graph layer, graph type (line, bar, points), symbol type or line type, color, size, etc. |
|
|
Columns: The name of the columns in the table that are shown as points in this graph layer. |
Tips:
See also: