When you wish to use the digitizer to add points, to move a point, or to edit the class name, ID or value of a point in your point map:
- Your digitizer should be set up properly:
the Setup Digitizer command, on the File menu of the Main window should be preceded with a check mark  .
.
- You should have performed a Map Reference, so that the coordinates sent by the digitizer can be translated into real world coordinates:
the Map Reference command on the File menu of the Main window, or the Digitizer, Map Reference command on the File menu of the point editor should be preceded with a check mark .
- You should make the digitizer Active in the editor, so that a floating window appears with the digitizer commands (the digitizer menu):
the Digitizer, Active command on the File menu of the point editor should be preceded with a check mark .
The digitizer menu with the digitizer commands looks like:
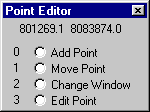
The coordinates at the top of the digitizer menu show the real world coordinates of your map (this is the result of Map Reference); these coordinates should change when you move the digitizer cursor over the digitizer tablet.
For detailed information on using the digitizer to add points, move points, or edit point names, IDs, or values, see Point editor : functionality, section Working with the digitizer.
Tip:
You can also use the mouse to add points, to move points or to edit the names, ID, or values of selected points, for instance when editing an existing map or when screen digitizing. For more information, see Insert mode or Move Points mode, Select Mode and Edit, or How to screen digitize.
See also:
How to setup a digitizer and start digitizing
Map Reference
Digitizer, Active
Point editor : functionality
Point editor : functionality, working with the digitizer
Point editor : functionality, working with the mouse
Point editor : toolbar
Point editor : menu commands