The polygon editor is used to edit a polygon map. With the polygon editor, you can only edit the class names, IDs or values of polygons. The polygon editor has a menu bar, a context-sensitive menu and a toolbar.
Tip: To create a polygon map, first digitize your segments with the segment editor and then polygonize the segment map in the segment editor. For more information, see How to create a polygon map.
You can edit polygons with the mouse on the screen but you can also use a digitizer when a map is fixed onto your digitizer tablet. When you wish to use the digitizer for the first time, you may have to setup the digitizer, reference the map on the digitizer, and/or make the digitizer active. For more information, see below.
Furthermore, in any map editor you can always use existing maps as a background by adding these maps as other data layers to the window, see How to add extra layers to a map window.
To edit a polygon map:
To edit a polygon map, display the polygon map in a map window, open the Edit menu, choose Edit Layer, and select the polygon layer from the cascading menu. You can also click a polygon map with the right mouse button in a Catalog and choose Edit from the context-sensitive menu. For other methods, see How to edit point, segment, polygon, and raster maps.
Dependent polygon maps cannot be edited: first break the dependency links in the Polygon Map's Properties sheet.
When the polygon editor is opened, it starts in Normal/Select mode; the mouse pointer appears as a hand.
Make sure that the digitizer is properly set up (Setup Digitizer wizard) and that the analog map is properly referenced on the digitizer tablet (Map Reference). The Setup Digitizer and the Map Reference commands on the File menu of the Main window should both be preceded with a check mark ![]() .
.
For more information, see How to set up a digitizer and start digitizing or Polygon editor : Digitizer.
When the digitizer is ![]() Active in the polygon editor, a small floating window will appear: the digitizer menu (see Figure 1). The digitizer menu contains the commands that will be performed when pressing the buttons on the digitizer cursor. The numbers in front of the commands on the digitizer menu correspond to the numbers of the buttons of your digitizer cursor.
Active in the polygon editor, a small floating window will appear: the digitizer menu (see Figure 1). The digitizer menu contains the commands that will be performed when pressing the buttons on the digitizer cursor. The numbers in front of the commands on the digitizer menu correspond to the numbers of the buttons of your digitizer cursor.
When in the description below, it is written that you have to press for instance the Change Window button, you have to press the cursor button of your digitizer cursor, which corresponds with the number in front of the Change Window option on the digitizer menu. In this example, this is the digitizer button corresponding with 2:
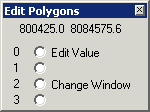
Fig. 1: Example of the digitizer menu in the polygon editor.
Editing a selected polygon:
Locate the digitizer cursor on the polygon you wish to edit. Press the Edit Value button to open the Edit dialog box. In the Edit dialog box, the area and length of the polygon are displayed; depending on the domain of the map that you are editing, you can enter a new class, ID or value.
Zooming/Changing the window:
Press the Change Window button. Move the cursor to the first corner of the area on which you wish to zoom in. Press the 1st Point button: you now see the zoom in box tied to the first point. Move the cursor to the 2nd position of the area on which you wish to zoom in. Press the 2nd Point button.
You can also directly position the digitizer cursor on the first corner of the area of interest, press the Change Window button, then move the cursor to the second corner of the area of interest, and press the 2nd Point button.
To display the entire map after a zoom in command, press the Entire Map button.
To zoom in on the map:
You can zoom in on the polygon map by for instance clicking the Zoom In button in the toolbar. For more information, see Map window : Zoom in.
Selecting polygons: ![]()
The polygon editor has one mode, Normal/Select mode, to select polygons of which you wish to change the class name, ID or value. In Normal/Select mode, the mouse pointer appears as a hand. You can select one or more polygons by clicking them, in order to change their class name, ID, or value.
click a polygon.
When you double-click a polygon, you can immediately change the class name, ID, or value of the polygon.
press and hold down the Ctrl key and click the other polygons you wish to select. When finished, release the Ctrl key.
press and hold down the Ctrl+Shift keys, then click previously selected polygons: these polygons are deselected. When finished, release the Ctrl+Shift keys.
press and hold down the Shift key, then click polygons: selected polygons are deselected, and non-selected polygons are selected. When finished, release the Shift key.
For more information, see Polygon editor : Normal/Select mode.
Editing the value of selected polygons:
Depending on the domain of the polygon map that you are editing, you can change the class name, identifier or value of selected polygons.
To edit the class name, ID, or value etc. of one or more polygons:
When you double-click a polygon, you can immediately select a class name, type an identifier, or type a value. Polygons in a polygon map using an identifier domain can only be edited individually.
When you selected multiple polygons, you can select a class name, or type a value for the selection in the appearing Edit dialog box. For more information, see Polygon editor : Edit.
All changes that you make are immediately stored in the polygon map.
Save: ![]()
When editing polygons in the polygon editor, all changes are immediately stored. However, to permanently store changes, you may use the Save button or the Save command on the File menu. After you used Save, any changes that you made before using Save, cannot be undone anymore with the Undo All Changes button or command. For more information, see Polygon editor : Save.
To undo all changes: ![]()
When editing polygons in the polygon editor, all changes are immediately stored. However, you can undo all changes, i.e. restore the polygon map until the moment when you last used Save, by choosing Undo All Changes from the File menu. For more information, see Polygon editor : Undo all changes.
Find undefineds:
When you wish to check whether all polygons have a valid class name, ID or value, you can use the Find Undefineds command on the Edit menu. By using Find Undefineds, all undefined polygons will appear in a special color, so that you can manually assign a proper class name, ID or value to the polygons. For more information, see Polygon editor : Find undefineds.
To customize the polygon editor:
By choosing Customize from the File menu or from the context-sensitive menu, you can select the colors in which you wish to see your digitizer cursor and undefined polygons. For more information, see Polygon editor : Customize.
Extract segments:
To extract all segments from the polygon map and create an editable segment map, select Extract Segments from the File menu. For more information, see Polygon editor : Extract Segments.
Create labels:
To create an editable point map in which each polygon has a label point, select Create Labels from the File menu. For more information, see Polygon editor : Create Labels.
Apply labels:
To apply point labels to the polygons, select Apply Labels from the File menu. For more information, see Polygon editor : Apply Labels.
Copy polygons to clipboard:
You can copy selected polygons with their coordinates and class names, IDs, or values to the clipboard. Select the polygons you wish to copy and choose Copy from the Edit menu. The coordinates of polygon boundaries and the polygon class names, IDs or values are copied. The copied polygon(s) will also be available as picture.
Copied polygons can be pasted for instance as points in a point editor, or as segments in a segment editor. For more information, see Polygon editor : Copy.
To exit the polygon editor:
To exit the polygon editor, choose the Exit editor option from the File menu or from the context-sensitive menu. You can also click the Exit editor button in the toolbar. In these cases, the editor is closed but the map(s) remain displayed in a map window.
When you double-click the Close button or the Control-menu box, the map and the editor are closed.
All changes that you make in the polygon map are continuously stored.
For more information, see also Appendices : Keyboard shortcuts and Appendices : Mouse functions.
See also: